Did you know that a few simple steps prior to writing your blog post could save you time and get your post seen by more people? I have created a blog post checklist for writing to help you remember all the steps along the way. Do you ever write a blog post and you know you’re missing steps? You write the post and then you try adding your keywords at the end but they don’t seem natural to the flow of your writing. You throw in a few images and a title and hit publish and hope for the best. Or maybe you have hit publish instead of save, or scheduled your post on the wrong day, or even forgotten all about SEO or to put your post in a category. If you can relate to any of these, you need this checklist! Make sure to pin this blog post checklist on your blogging board!
PIN ME!
Get your free blog post checklist printable!
I want to send this freebie right to your inbox, all your need to do is put your name and email in the box below and go check your e-mail to print it off, make sure it is sent to print to the edge or scale it as needed. I suggest either having this on your computer to reference as you are writing or better yet, print it off, stick it on the wall of your desk or laminate it to refer to as you are writing. The point is, go through these steps each and every time, or at least think about these steps so that if you miss something it is intentional and not something you are going to be kicking yourself for in the moment. I will go into detail on each step, what I use and how I do it, below so keep reading!
The progression of steps that will grow your blog faster!
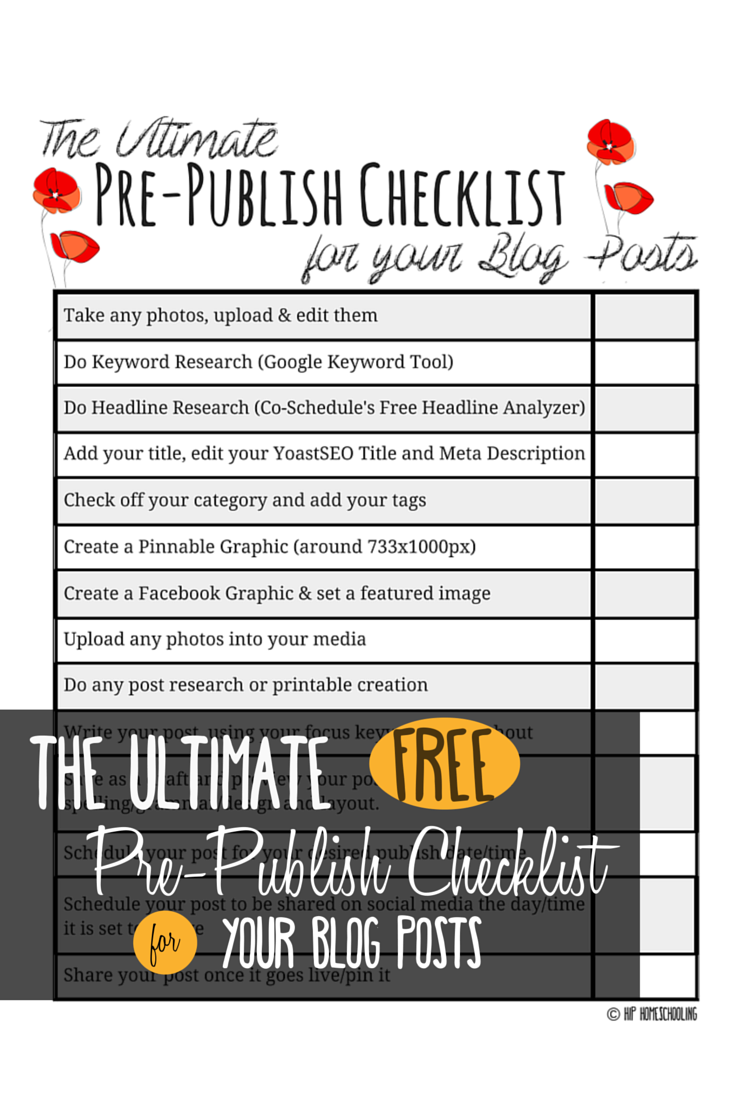
1. Take any photos, upload & edit them. If you have any photos to take for your post, whether that be of a craft or activity, product, etc. this is your number one step. Once you have your photos, upload them and edit them. Resize them as needed, add meta information if you can, etc. I use Lightroom for my photo editing through Adobe.
2. Do Keyword Research (Google Keyword Tool). I recommend doing this before you do anything else, the reason for this is that you can use this keyword as you are creating your Pinterest description, writing your post, crafting your blog post title, etc. If you try to add your focus keyword in at the end, it won’t naturally flow through your post. It is much easier to figure out your keyword first and use that to help you as you create your content. I use Google Adwords free tool, keyword planner. If you don’t have an adwords account, you can create one at https://www.google.com/adwords/. I did about $5 of advertising through them when I first started and then have been using this tool ever since.
3. Do Headline Research. I do not do this for every post I write, but the ones I want or need to go the distance, I use a headline analyzer. I find that rewording a title 5-7 times helps me make sure it is the best version of that title and in the beginning it completely changed the way I wrote them. You can use co-schedules free analyzer here.
4. Add your title, edit your YoastSEO Title and Meta Description. If you use Yoast SEO, this is the time to edit all that information, yes, before you even begin writing your post! Make sure your title, your URL, your search title and meta description have all been updated, using your focus keyword.
5. Check off your category and add your tags. This is on the right hand side, add a new category if you don’t have one that fits, but try to keep your post in a category, it makes it easier to search. You can (and should) also add tags to help people find your post when they are searching on your blog. Just do a few, but this is a great time to use relevant keywords you think people will search.
6. Create a Pinnable Graphic (around 733x1000px) and your Facebook Graphic (around 810x450px). I use canva for this, though PicMonkey is another free tool. I prefer canva as you can save your designs and re-use them, you can save your colors and photos into files, I pay for canva for work so I actually re-size my Pinterest graphic into a Facebook app graphic and just move things around. It saves me about 15 minutes of time and I value every minute I can save on stuff like this. As you can see, there is more prep that goes into my posts than actual writing. That is the easy part!
7. Upload any photos into your media (see why you need a blog post checklist?). If you are using screenshots or edited photos or stock photos (check out Adobe Stock if you don’t have a decent stock photo provider).
8. Do any post research or printable creation. I generally create my printables before I do any of this as I use the images of my printables to create my graphics. But this is the time I would add them to my free download form, upload them into Google Drive and grab my share link, I also do post research at this point. For most of my posts I do quite a bit of research. I read relevant posts or articles, I look up information on a vendor website, etc.
9. Finally, step 9, the actual writing! Now you get to write your post, using your focus keyword throughout. This is important, you have a focus keyword, don’t overuse it, that can hurt you, but thread it throughout. I generally try to have it every second paragraph or so. Also make sure it is in your first paragraph and at least one heading this would be a h2 or h3 depending on what you use.
10. So many people miss this step, step 10 is to save as a draft and preview your post. This is when you are going to look over your post as it looks like to the public. Proofread it for spelling or grammar errors, check over the layout and design. Are the pictures the right size? Is everything spaced right? Is everything aligned correctly? This is the tweaking stage and if you miss it, you can really tell in the final product! So take the time for this step, star it in the printable!
11. Schedule your post for your desired publish date/time and also schedule it to be shared. I use Post Planner and Co Schedule for this. Although I do all of my regular scheduling through Post Planner, I use Coschedule for all my blog posts, as it is a plug in that shows up right underneath each post that I write. Again, any time saver is worth the money to me. So I just scroll down and schedule my post to be shared as soon as it goes live on any of my groups or twitter, google plus, pinterest, etc. and then again a month later. You can also manually schedule your posts using the Facebook schedule tool, etc.
12. Share your post once it goes live/pin it. Once your post goes live, share it in any groups you are a part of (make sure to read the rules) and pin it on Pinterest, on any relevant boards, etc. Market your post as much (or as little) as you would like, but try to spend at least 5 minutes doing this once it goes live. It will help it go the distance and make sure it is seen by the most amount of people.
Need more blogging tips or interesting in starting a blog? Check out my courses How to Start a Blog and Make Money Blogging in 30 Days! Or come say hi on Facebook!